


Introduction
In part 1 I covered different options to look for when choosing a pentest dropbox. In this part I'll walk you through my OpenVPN setup for connectivity and management of dropboxes. Part 3 walks through the provisioning of a dropbox to work with this setup.
This method is superior to SSH since OpenVPN is designed for this type of remote connectivity.
Benefits of OpenVPN over SSH
This setup will save you a lot of time during your internal pentests. This reason alone is worth using openVPN. If you spend a little time up front building simple infrastructure, you'll be rewarded with more time to test and less time managing connectivity. Here are some other reasons:
- Supports routing of traffic
- Uses NAT to source traffic (this means testing from your laptop but having traffic look like its from the dropbox)
- Supports multiple pentesters (concurrency)
- Stable and reliable (auto connects, you can specify backup servers and ports, deaomized, etc.)
- Supports proxies (with NTLM auth)
- Centralized configuration
- Easy key management with certificates
- Scalable with no additional effort
If these reasons are not convincing enough, I'd like to hear your feedback.
The Architecture
OpenVPN is our critical infrastructure. Here is a visual of what we are building:
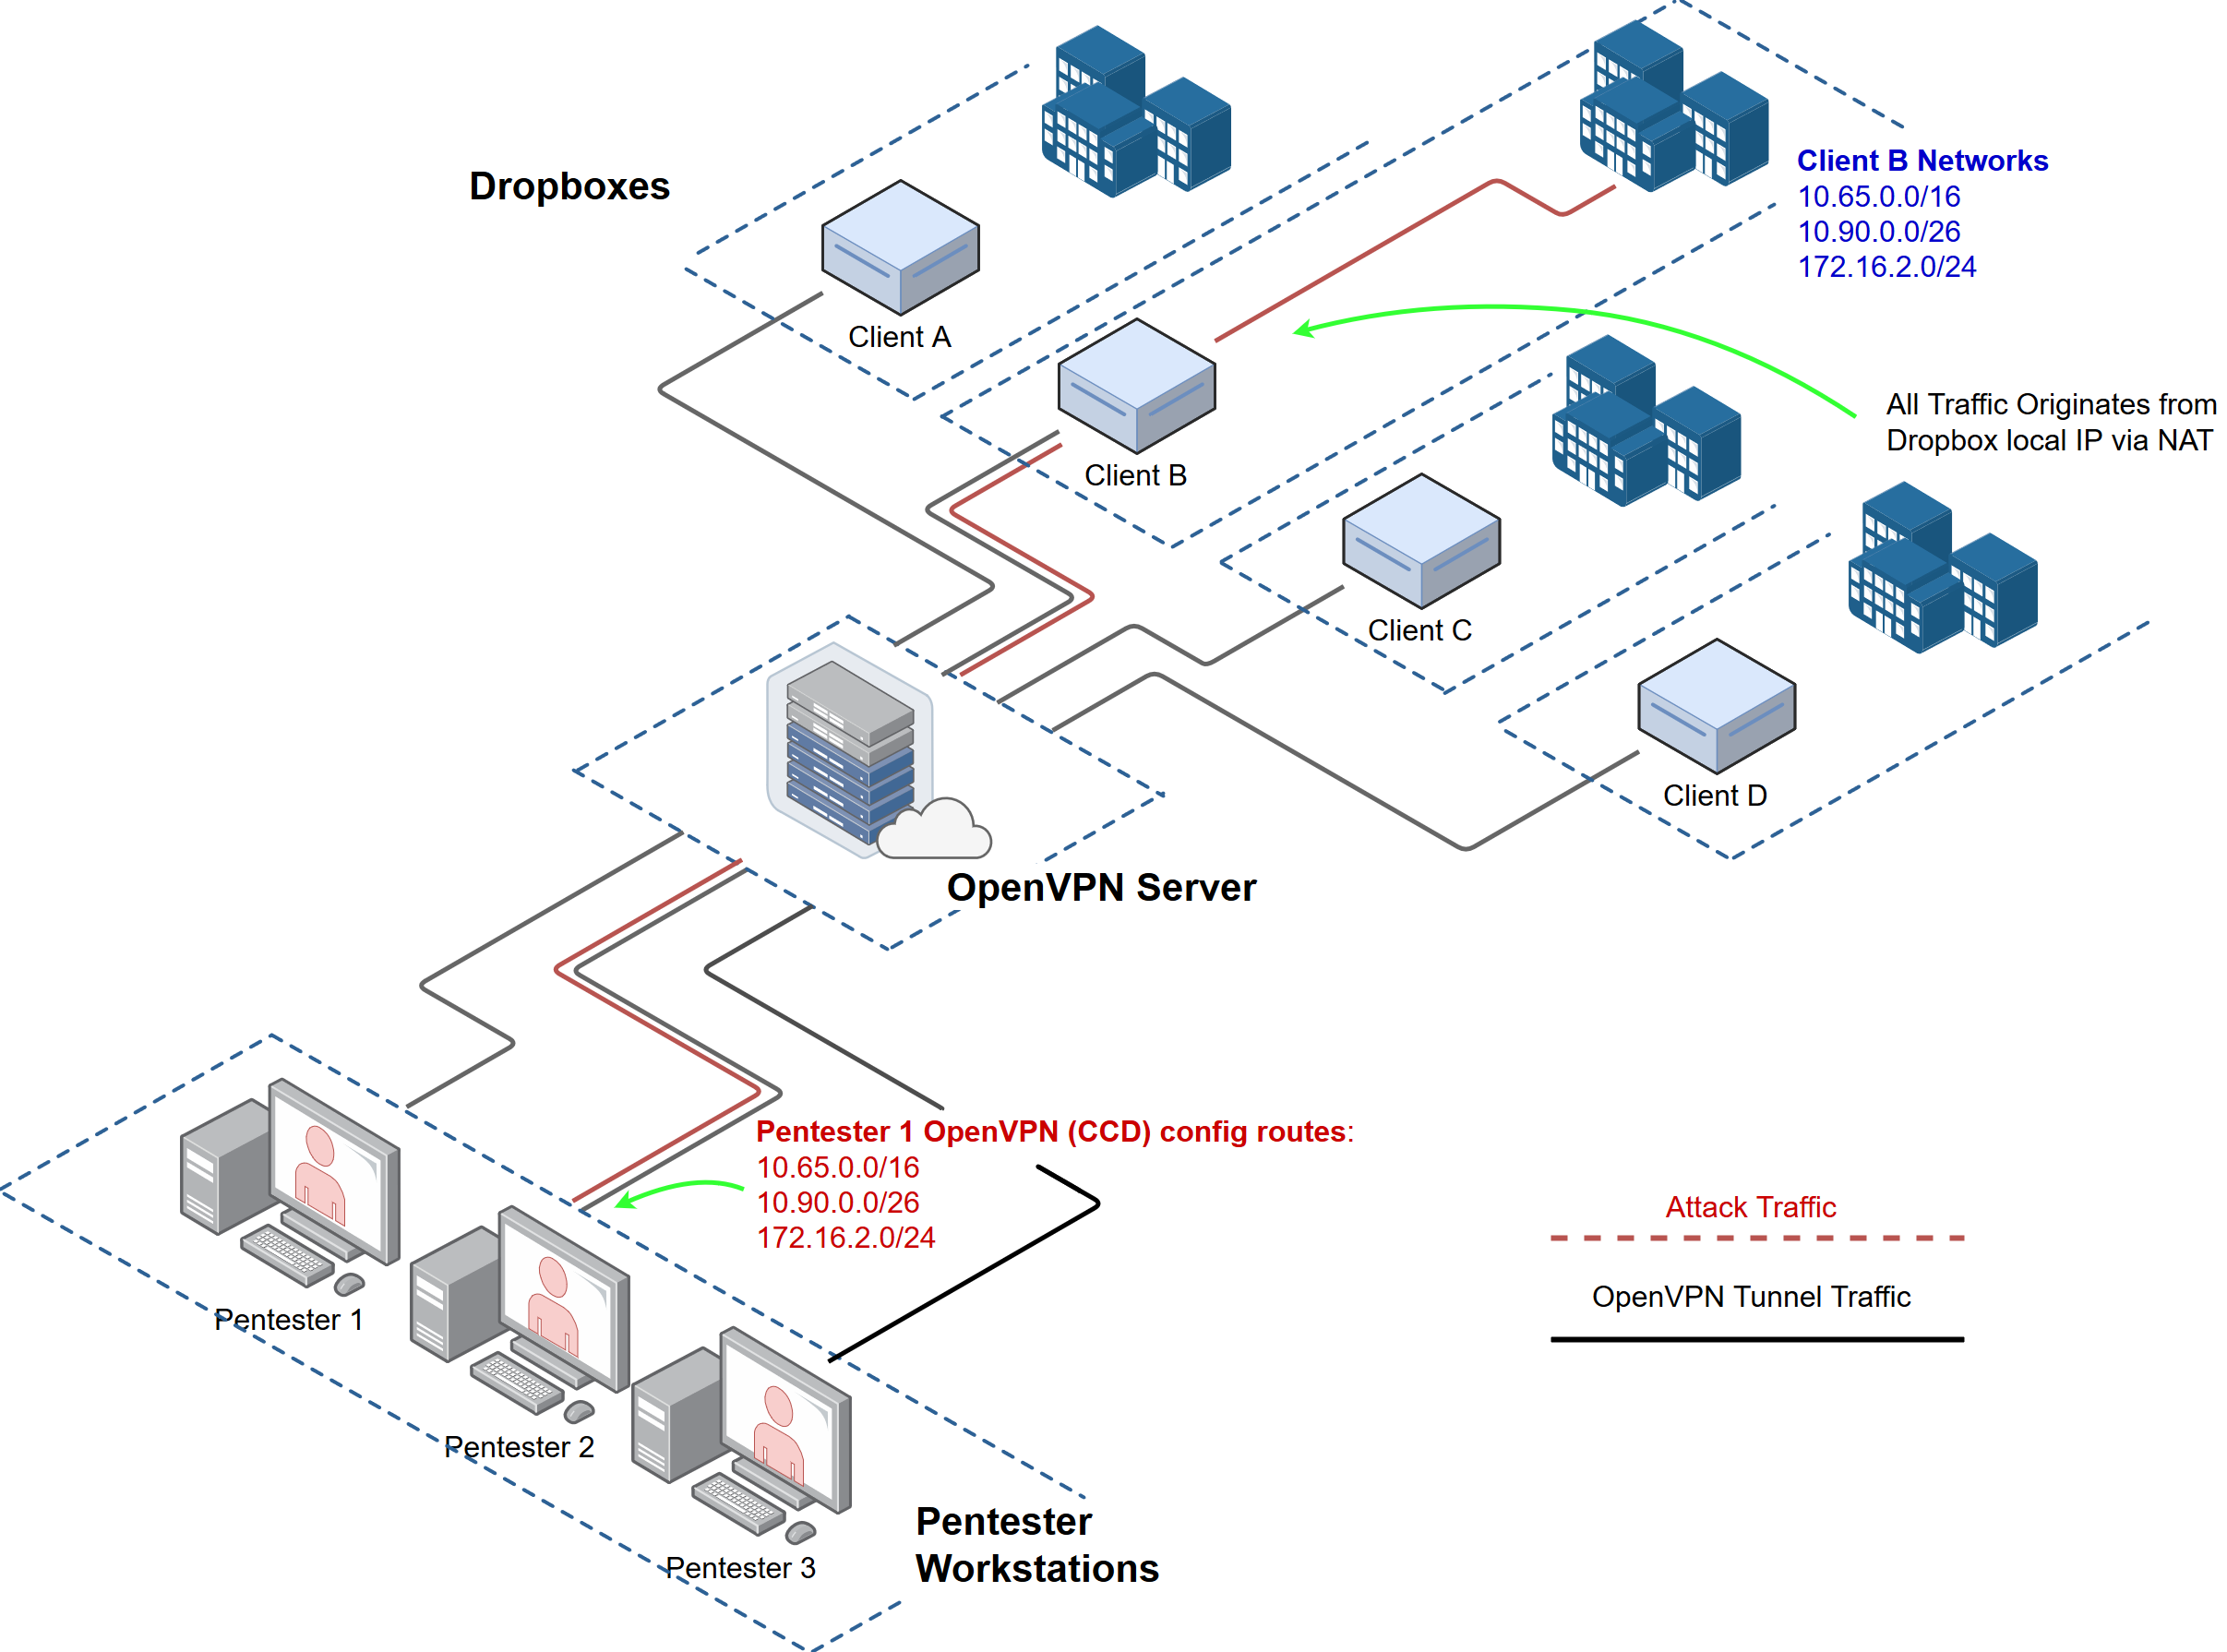
The light blue boxes labeled "ClientX" are the physical dropboxes. The openVPN server can be hosted on perm or in the cloud.
Setup the OpenVPN server (One time setup)
1. Install OpenVPN
Starting from a fresh Ubuntu server install, we'll setup OpenVPN:
apt update
apt -y upgrade
apt install openvpn easy-rsa
cd into /etc/openvpn
2. Openvpn Server Config File
Create a file /etc/openvpn/pttunnel.conf with the following data:
dev tun0
tls-server
user nobody
group nogroup

# Openvpn tunnel network
server 10.254.254.0 255.255.255.0

# IP Address we listen on
local <LOCAL_IP_OF_SERVER>

# Port and Protocol
port 1194
proto tcp

comp-lzo
cipher AES-256-CBC

# IPP allows you to statically assign tunnel network IPs to dropboxes
#ifconfig-pool-persist /etc/sysconfig/openvpn/ruvpn-ip-pool.txt

# mgmt & log settings
management 127.0.0.1 1196
log /var/log/openvpn
mute-replay-warnings
# verbose level, turn up if troubleshooting for more logs. 6 is usually good.
verb 3

# Maximum number of simultaneous clients
# enabling this allows multiple connections using the same cert. However, this is insecure.
# if someone steals your certs from a dropbox both the legit and malicious connections could exist simultaneously.
#max-clients 50

client-to-client
client-config-dir ccd

#Option, set renegotiation time
#reneg-sec 86400

#location of cert files
dh /etc/openvpn/easy-rsa/keys/dh2048.pem
cert /etc/openvpn/easy-rsa/keys/pttunnel.crt
ca /etc/openvpn/easy-rsa/keys/ca.crt
key /etc/openvpn/easy-rsa/keys/pttunnel.key
# set this up upon first revoke
#crl-verify /etc/openvpn/easy-rsa/keys/crl.pem

#Timeout for restarting the tunnel on client end if it loses connection
keepalive 10 60
persist-tun
persist-key

#keep mtus low to account for additional encapsulation
link-mtu 1250
mssfix 1250
- Note: this configuration is also available on github
Create the client configuration directory (aka ccd): mkdir /etc/openvpn/ccd
3. Generate OpenVPN Server Certificates (One time setup)
Easy-rsa is a set of scripts to make certificate management painless. Copy over the easy-rsa directory:
cp -a /usr/share/easy-rsa /etc/openvpn/
cd into /etc/openvpn/easy-rsa and generate a server certificate using the following commands:
. vars
./clean-all
./build-ca
./build-dh
./build-key-server pttunnel
touch keys/crl.pem
Tip: you can improve your security by keeping your certificate authority on an internal system/fileshare/git repo, etc.
4. Test the Server Config
At this point you should be able to run the OpenVPN server.
- cd into
/etc/openvpn - Test OpenVPN with the following command:
sudo openvpn -config pttunnel.conf - Make sure the server runs without any issues before proceeding.
5. Set OpenVPN to Run on Boot
For the lucky people not using systemd ;-)
update-rc.d openvpn enable
Start openVPN now as a daemon:
sudo /etc/init.d/openvpn start
Setup OpenVPN Pentester/Client Connections (Do these steps for each pentester)
1. Generate OpenVPN Client/Pentester Certs (Do this on the OpenVPN Server)
cd into /etc/openvpn/easy-rsa and generate a certificate using the following commands:
Replace 'pentester01' below with the names of each pentester
. vars
./build-key pentester01
2. Configure the OpenVPN Client on the Pentester's Workstation (Do this on the workstation/client)
You should only have to do this once for each pentester/consultant. At Sprocket sometimes a pentester may have multiple workstations they connect from. In that case, we generate separate certificates for each of their machines (ex: pentester01, pentester01-windows).
In this example I'm assuming the pentester/consultant is using Ubuntu Desktop, but Windows or OSX will work.
Securely copy the following certificates you generated in the previous section (from the OpenVPN server):
/etc/openvpn/easy-rsa/keys/ca.crt
/etc/openvpn/easy-rsa/keys/pentester01.crt
* /etc/openvpn/easy-rsa/keys/pentester01.key
...and copy them to the /etc/openvpn directory on the workstation.
Create the OpenVPN client configuration file /etc/openvpn/pttunnel-client.conf with the following data:
client
dev tun
proto tcp
remote-cert-tls server
remote <PUB_IP_OF_OPENVPN_SRV> 443
remote <PUB_IP_OF_OPENVPN_SRV> 80
remote <PUB_IP_OF_OPENVPN_SRV> 53
persist-key
persist-tun
verb 3
ca <FULL_PATH_TO_CA.crt>
cert <FULL_PATH_TO_PENTESTER01.crt>
key <FULL_PATH_TO_PENTESTER01.key>
cipher AES-256-CBC
comp-lzo
After copying the certificates from the previous section onto the pentester's workstation. Test the OpenVPN configuration file and verify the tunnel establishes:
- cd into
/etc/openvpn - Test OpenVPN with the following command:
openvpn -config pttunnel-client.conf - Make sure the server runs without any issues before proceeding. Note: you wont be able to route any traffic yet, but if things are working you should be able to ping the far end of the tunnel's network address (ex: 10.254.254.3)
Troublshooting Tips for OpenVPN clients
- Increase the
verbdirective on the client to better understand the failure. - If you're setting this up and testing the tunnel from the internal network, it's ok to change the
remotedirective to point to the internal IP address of the OpenVPN server for testing. - Make sure your certificates are readable. I always specify full path to be safe.
- Make sure your date and time are accurate on both server and clients.
- Below are some useful commands during troubleshooting:
route -n
tcpdump -nni tun0
nc 127.0.0.1 1196 <type: 'status' in shell>
Congrats! You should now have a working OpenVPN server that pentesters can connect to. However, its not very useful until we get our dropboxes connected.
Continue to part 3 to learn how to provision a dropbox to work with this OpenVPN server.

