

Overview
Protecting your infrastructure from prying eyes is an important part of landing a phish and maintaining access to a client’s network. The process of setting up redirectors and reverse proxies has traditionally been difficult and hard to automate across different cloud platforms.
Today, we’re going to solve that problem with our new repository, sneaky_proxy, which will allow you to automate your efforts.

The problem
Well, well, well. Google flagged your site as malicious before you could even get it in an email to send during a phishing campaign. We’ve all been there.

To protect our phishing sites and C2 infrastructure we have traditionally done the following: Setup a GoPhish server by hand Set up an Apache server and reverse proxy by hand Installed some redirect rules to shield ourselves from the boys in blue Pray that we don’t get permabanned off the face of the internet before we can send a phishing email
The situation
Let me paint a picture for you. You created an awesome phishing landing page that looks like this:

This site is hosted at the URL listed below: * https://mail.acme.com
You send out a phishing email containing this link. Users are supposed to click, navigate to the page, and enter their credentials. If it works, you made this engagement.
Unfortunately, you’re sending this email to a client using a Proofpoint mail gateway. The second that email hits the mail gateway, automated tooling crawls your webpage and realizes it’s a phishing page. The URL is blocked and you lost hours of work.
The solution
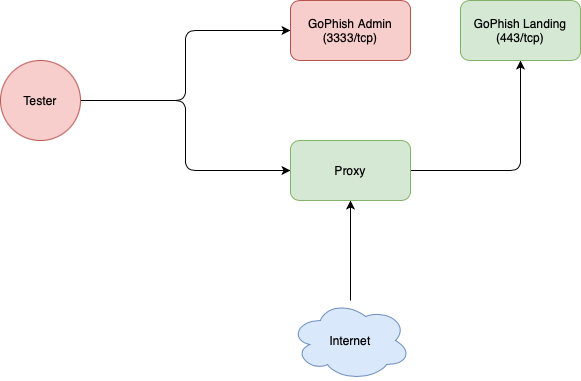
To solve this problem, testers started implementing transparent reverse proxies and redirection rules to hide that page from prying eyes. They did so by redirecting traffic originating from: Cloud services , as they most often host security solution scanners User agents associated with Google’s bots and other URL crawling services * IP ranges from countries not shared by your target client
We collect this information and build a big list of predefined indicators stating that the traffic your web server receives isn’t from your client but instead originates from Google, Microsoft, Proofpoint, etc.
We then use this information to define rule lists that redirect all unwanted traffic to a benign location. Most often we use NGINX or Apache web application frameworks to do this.
With Apache, for example, we take the information we collected and use it to generate Apache and NGINX redirect rules. In Apache, we use the mod_rewrite module to accomplish this task.


A redirect file is created and included in the Apache configuration. Someone automated the creation of this file for us. 0xZDH did and their repository is included below.
 https://github.com/0xZDH/redirect.rules
This is all well and good, but we aren’t really saving much time here. Instead, we’re only adding more work. We’re pentesters for Christ’s sake! We need to automate this! Luckily, we did and we’re sharing it with you for the first time today. We containerized the process and made it easy to deploy.
Let’s walk through the process using our new repository sneaky_proxy. This repo will allow us to quickly set up a reverse proxy without all the fuss. It does this using Docker and everyone’s usual tooling. The container does the following on launch: Downloads the latest version of 0xZDH’s redirect.rules Provisions an Apache server Downloads and installs a certificate associated with a DNS record Configures and starts a reverse proxy while also shielding you from prying eyes
The setup
First, we need to set up a couple of cloud hosts. One will host our GoPhish instance and the other our Apache reverse proxy. We’re going to use AWS to accomplish this.
Standing up your servers
Use the following launch options to configure two micro Ubuntu AWS instances:

Installing Docker
Once they’re created, SSH into each host install docker and docker-compose with the following command:
`bash
curl https://raw.githubusercontent.com/its-a-feature/Mythic/master/install_docker_ubuntu.sh | sudo bash
`
Sneaky GoPhish install
On one host, then clone our project sneaky_gophish. Go through the install steps included in the repository and our linked blog article.

Creating an A Record
On the second server, grab the host’s public IP and navigate to your DNS registrar. For this exercise, we’re using Route53 in AWS. Assign an A record for whatever domain you would like to the IP address of your second EC2 instance.

Installing and configuring sneaky_proxy
Once your record is assigned, SSH into your second EC2 instance and clone our sneaky_proxy repository.
git clone https://github.com/puzzlepeaches/sneaky_proxy && cd sneaky_proxy
Variables used by the sneaky_proxy container are set in a `.env` file within the repository. Open up the file in your favorite editor and modify the values to meet your needs.
Redirect scanner traffic to this domain
REDIRECT_URL=outlook.office365.com

The domain you have assigned to the second EC2 instance
PROXY_DOMAIN=signup.endpointenroll.com

The location of your GoPhish server
HIDDEN_HOST=3.45.22.33:8080
The `REDIRECT_URLvariable is the location you want to send traffic coming from places such as Microsoft, Google, and VirusTotal. ThePROXY_DOMAINvariable is the domain you just assigned to the proxy server. TheHIDDEN_HOST` variable is the location of your GoPhish server listener. This can be C2 as well.
Building the container
Once setup is complete, execute the command below to build the container.
docker-compose build
It should look something like this:

Running the container
Once the container builds successfully, execute the command below to get the reverse proxy up and running.
`bash
docker-compose up -d
`
You now have a working transparent reverse proxy that will redirect bad traffic to the Office 365 login page.

docker logs -f sneaky_proxy
Navigate to the URL you specified `PROXY_DOMAIN` variable ,and you should see the default GoPhish 404 page included with sneaky_gophish.

Even better, navigating to the phishing link we listed above won’t reveal the IP address of your landing page. Instead, the A record you set is always shown as the URL of the page in your status bar.
Configuring network restrictions
Following this, you always want to create a security group that only allows inbound traffic to the GoPhish server from your reverse proxy.
What we did
So what did we do? We set up two micro EC2 instances Assigned a DNS record to one of the instances Set up GoPhish using sneaky_gophish Set up a transparent reverse proxy using sneaky_proxy
Why all this matters
Evading controls is getting harder and harder. Simply standing up GoPhish and sending out an email is going to get you flagged and cause your engagement to fail.
Even more so, setting up new infrastructure is difficult and time-consuming. Baking your infrastructure with pre-built defenses against defenders is key to successful social engineering engagements.